Abelian Pro Mobile Wallet User Guide
Introduction to Abelian Pro
Abelian Pro is a mobile wallet application designed for the Abelian blockchain and its Layer 2 network QDay, supporting both iOS and Android platforms.
As a cryptocurrency wallet for the post-quantum era, Abelian Pro features the following core characteristics:
- Quantum Security: Based on quantum-resistant cryptographic algorithms, protecting your digital assets from future quantum computing threats;
- Multi-Level Privacy (MLP): Supports both Pseudo-Private and Fully-Private address types, allowing you to choose privacy levels based on your needs;
- Dual-Chain Support: Simultaneously manage Abelian Layer 1 (ABEL) and Layer 2 (QDAY) assets;
- Redesigned Interface: Intuitive and user-friendly interface providing a smooth operational experience;
- Auto-Sync: Fast blockchain data synchronization ensuring real-time transaction information updates;
- Cross-Platform Compatibility: Seamless switching between iOS and Android devices.
Important Notes
- ABEL is the native token of the Abelian Layer 1 blockchain, using quantum-secure privacy technology;
- QDAY is the token of the Abelian Layer 2 network, compatible with Ethereum Virtual Machine (EVM), and can be exported as a private key and imported into MetaMask.
Download Abelian Pro Application
iOS Platform
- Open the App Store on your iPhone or iPad
- Search for "Abelian Pro" or go directly to Abelian Pro on App Store
- Tap the "Get" button to download and install the application
- After installation, tap the Abelian Pro icon on the home screen to launch the app
System Requirements: iOS 13.0 or higher
Android Platform
Method 1: Google Play Store
- Open Google Play Store on your Android device;
- Search for "Abelian Pro" or go directly to Abelian Pro on Google Play;
- Tap the "Install" button to download and install the application;
- After installation, tap the Abelian Pro icon in the app list to launch the app.
Method 2: Direct APK Download
- Go to Abelian Community Website Downloads Page to download the Abelian Pro APK file;
- Open the file manager on your Android device;
- Locate the downloaded APK file;
- Tap the APK file to begin installation;
- After installation, tap the Abelian Pro icon in the app list to launch the app.
System Requirements: Android 6.0 or higher
First-Time Setup Guide
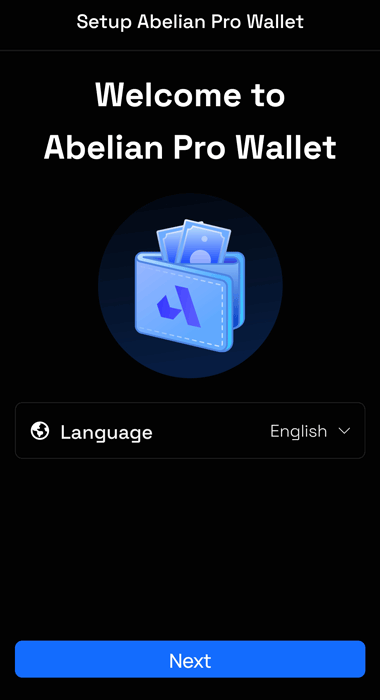
When you first launch the Abelian Pro application, you will see the welcome screen.
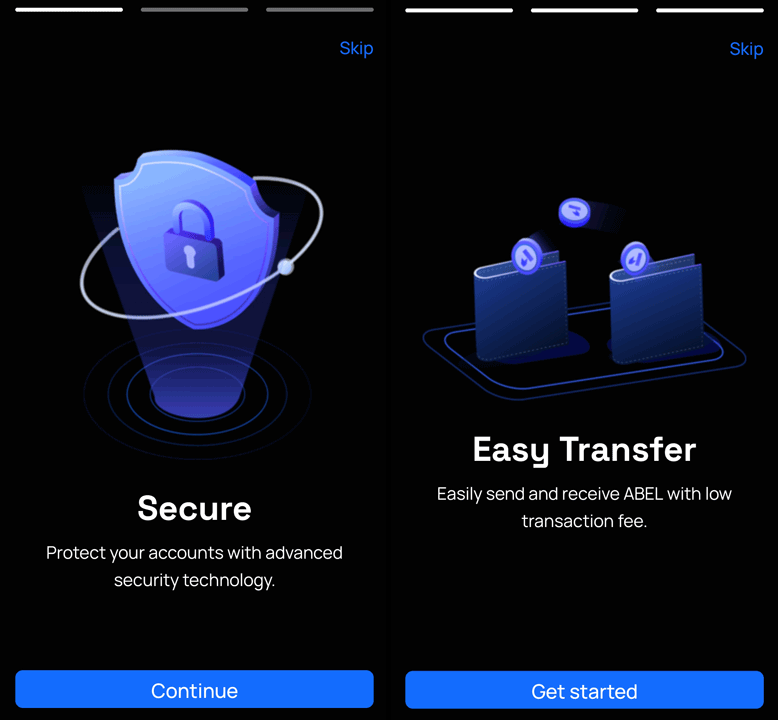
Tap the "Continue" button repeatedly to read through the Abelian Pro feature introduction pages, then tap the "Get Started" button to enter the language selection screen. Select your language and tap the "Next" button to enter the wallet main interface;
The bottom navigation bar of the main interface is divided into four sections:

- Abelian: $ABEL wallet page, where you can purchase and transfer ABEL, and view ABEL wallet type balances, transaction history, and other information;
- QDay: $QDAY wallet page, where you can transfer QDAY and view balances and transaction history for QDAY, WQDAY, WABEL, and USD8, with support for USD8 conversion, and includes web links for ABEL Bridge, ABEL Staking, QDay Staking, and QDay Swap;
- Discover: Discovery page, displaying Abelian's official website cluster, market data, and official social networks;
- Settings: Settings page, providing wallet language, theme, fingerprint lock, network settings, as well as about information and application logs.
Create ABEL Wallet Account
Abelian Pro supports two different types of wallets: Legacy and MLP, each with specific purposes and advantages.
- Create Pseudo-Private Wallet: Pseudo-Private wallets provide a balance between privacy and performance, suitable for daily transactions, with the highest transfer amount limit.
- Create Fully-Private Wallet: Fully-Private wallets provide the highest level of privacy protection, completely hiding transaction information, with a transfer amount limit higher than Legacy wallets.
- Create Legacy Wallet: Legacy wallets are the old wallet type, replaced by the new Multi-Level Privacy (MLP) wallets. Creating Legacy wallets is not recommended unless you need to migrate assets from an old Abelian wallet.
Creation Steps:
- On the Abelian wallet main interface, tap the "I don't have an ABEL account" button to start creating an ABEL wallet;
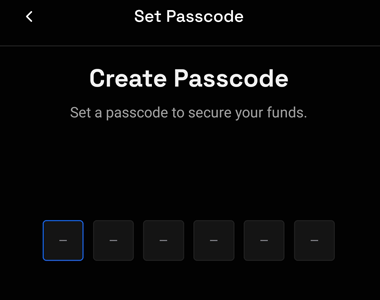
- When creating a wallet for the first time, the Passcode setup screen will automatically appear. Enter a six-digit password twice. If the device has fingerprint or "Touch ID" functionality, a Biometric Login confirmation screen will appear. Tap the "Confirm" button to complete security setup;
- On the Create Account interface, set the wallet "Name"⓵ and tap the "Create" button⓶ to create the wallet;
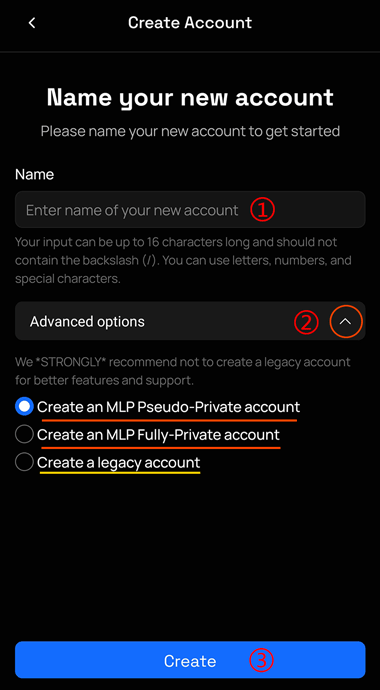
- The Advanced options below can be expanded⓷ to choose between "Create an MLP Pseudo-Private account", "Create an MLP Fully-Private account", and "Create a Legacy account". The default is Pseudo-Private wallet;
- After confirming the password or biometric authentication, tap the "Done" button to complete wallet creation and enter the wallet main screen.
Create QDAY Wallet Account
QDay wallet accounts use EVM-compatible private key format. In Abelian Pro, there's no need to configure the QDay network; you only need to link it with an existing ABEL wallet.
Note
If your ABEL wallet is a Legacy wallet, you cannot create a QDay wallet and need to upgrade to an MLP wallet.
Creation Steps:
- Select the QDay tab on the main interface;
- Tap the "Open linked account" button to start creating a QDay wallet linked to the currently used ABEL wallet.
Get Wallet Address to Receive Tokens
After creating a wallet, you need to get the wallet address to receive token assets.
Receive ABEL
- On the wallet main interface, select the Abelian tab
- On the right side of the ABEL amount display section at the top, there is an "Address" line. Tap the copy icon next to it to copy the ABEL short address to the clipboard
- Tap the "Receive" button below the amount section to display your complete ABEL wallet short address and corresponding QR code
- Tap the copy icon below the short address to copy the ABEL short address to the clipboard
- Or have the other party scan the QR code to send assets
Receive QDAY
- On the wallet main screen, select the QDay tab
- On the right side of the QDAY amount display section at the top, there is an "Address" line. Tap the copy icon next to it to copy the QDAY short address to the clipboard
- Tap the "Receive" button below the amount section to display your complete QDAY wallet short address and corresponding QR code
- Tap the copy icon below the short address to copy the QDAY short address to the clipboard
- Or have the other party scan the QR code to send assets
Switch Wallet Accounts
- Select the Abelian tab on the main interface
- Tap the wallet name at the top of the ABEL wallet to expand the "Select Account" menu and choose the wallet you want to switch to;
- Switch to the QDay tab, and it will automatically switch to the QDAY wallet linked to the current ABEL wallet.
Export ABEL Wallet
Security Warning
Mnemonic phrases and private keys have complete control over your wallet and are the only credentials for wallet recovery. Please ensure to:
- Write them down on paper and store them in a safe place
- Do not take screenshots or save them on internet-connected devices
- Do not share them with anyone
- Losing the mnemonic phrase will make wallet asset recovery impossible
- ABEL wallet private keys and mnemonic phrases cannot be imported into MetaMask
Export ABEL Wallet Private Key or Mnemonic Phrase
Exporting ABEL wallet mnemonic phrase or private key can be used for backup to restore the wallet on other devices.
Export Mnemonic Phrase or Private Key Steps:
- On the main screen, select the Abelian tab and tap the "Profile" icon in the upper right corner
- On the Profile page, tap the "Backup" button
- After entering the password or biometric verification, the mnemonic phrase or private key content will be displayed. Tap the "Copy" button to copy the mnemonic phrase or private key
- Please keep the copied mnemonic phrase or private key safe
Export QDay Wallet Private Key
QDay wallet uses EVM-compatible private key format and can be exported and imported into EVM wallets like MetaMask.
Export Steps:
- On the main screen, select the QDay tab and tap the "Profile" icon in the upper right corner
- On the Profile page, tap the "Backup" button
- After entering the password or biometric verification, the private key content will be displayed. Tap the "Copy" button to copy the private key
- Please keep the copied private key safe
Tip
QDay private key format: 64-character hexadecimal string starting with 0x, for example: 0x1234567890abcdef1234567890abcdef1234567890abcdef1234567890abcdef
Import QDay Wallet into Metamask
After exporting the QDay private key, you can import it into MetaMask wallet for use.
For detailed steps, please refer to: MetaMask Wallet Account User Guide - Import QDAY Wallet
Import ABEL Wallet
If you already have an ABEL wallet mnemonic phrase or private key, you can import it into Abelian Pro.
Import via Mnemonic Phrase or Private Key:
- On the wallet main interface, select the Abelian tab
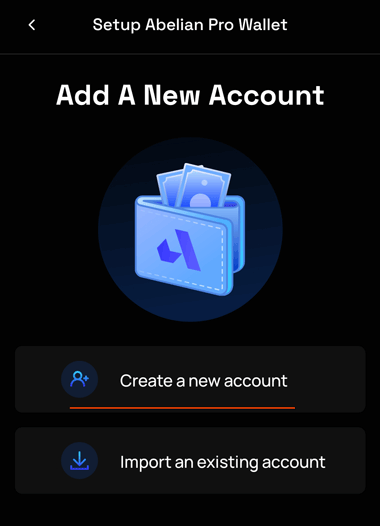
- Tap the "Import an existing account" button
- When you already have a wallet and need to create a new one, select "Add a new account" at the bottom of the "Select Account" menu
- On the "Import Account" page, fill in the wallet "Name" and "Mnemonic Phrase or Private Key"
- Tap the "Import" button to complete ABEL wallet import.
Import QDay Wallet
- On the wallet main screen, select the QDay tab;
- Tap the "Import existing account" button and enter the QDay wallet private key in the "Private Key" input box;
- Tap the "Import" button to complete the import and link to the current ABEL wallet.
Transfer ABEL
Send ABEL tokens to other Abelian wallet addresses (including Pseudo-Private, Fully-Private, and Legacy wallet addresses)
Notes
- ABEL transactions usually require multiple block confirmations to complete
- You can view confirmation progress in real-time in transaction history
- The wallet will automatically sync and update balances
Transfer Steps:
- On the wallet main screen, select the Abelian tab;
- Tap the "Send" button;
- In the "Send ABEL" selection menu, you can choose:
- "New address": Enter the recipient's ABEL address
- "ABEL Bridge": Scan the QR code on the ABEL Bridge webpage to automatically fill in the ABEL address for exchanging staking WABEL tokens
- "Your Accounts": Select an existing ABEL wallet account in the current Abelian Pro
- "Contacts": Select a saved contact ABEL address in the current Abelian Pro
- Using "New address" as an example, enter the "Send ABEL" page and input the "Recipient's address" through the following two methods:
- Tap the "Scan QR" button to automatically fill in the ABEL address by scanning the ABEL address QR code on another device
- Tap the "Paste" button to paste the ABEL address from the clipboard
- Enter the transfer amount in "Amount of ABEL"
- You can tap the "Max" button to send the entire balance (minus fees)
- Review the transaction details and tap the "Send" button, enter the password or biometric verification, wait for transaction confirmation on-chain to complete the ABEL token transfer.
- Return to the "Transactions" section of the Abelian tab to view transaction details, including:
- Transaction hash
- Transaction time
- Transfer amount
- Confirmation status
- ABEL explorer link
Transfer Recommendations
- When transferring to a new address for the first time, it's recommended to send a small test amount first
- Carefully verify the receiving address, blockchain transactions are irreversible
- Network congestion may require longer confirmation times
- You can view transaction hash and detailed information in transaction history
Transfer QDay
Send QDAY tokens to other QDay wallet addresses.
Transfer Steps:
- On the wallet main screen, switch to the QDay tab;
- Tap the "Send" button;
- In the "Send QDAY" selection menu, you can choose:
- "New address": Enter the recipient's QDAY address
- "ABEL Bridge": Scan the QR code on the ABEL Bridge webpage to automatically fill in the QDAY address for exchanging staking WABEL tokens (not yet online)
- Using "New address" as an example, enter the "Send QDAY" page and input the "Recipient's address" through the following two methods:
- Tap the "Scan QR" button to automatically fill in the QDAY address by scanning the QDAY address QR code on another device
- Tap the "Paste" button to paste the QDAY address from the clipboard
- Enter the transfer amount in "Amount of QDAY"
- You can tap the "Max" button to send the entire balance (minus fees)
- Review the transaction details and tap the "Send" button, enter the password or biometric verification, wait for transaction confirmation on-chain to complete the QDAY token transfer.
- Return to the "Transactions" section of the QDay tab to view transaction details, including:
- Transaction hash
- Transaction time
- Sender address
- Recipient address
- Transfer amount
- Confirmation status
- QDay explorer link
QDay Transfer Features:
- Fast transaction speed, usually confirmed within seconds to minutes
- Lower gas fees, suitable for frequent transactions
- Supports sending QDAY and various ERC20 tokens
- Transaction details can be viewed on the QDay blockchain explorer
Notes
- Ensure the receiving address supports the QDay network
- When sending ERC20 tokens, ensure the wallet has enough QDAY to pay gas fees
- QDay addresses have a different format from ABEL addresses, please do not confuse them
View Wallet Information and Sync Status
Abelian Pro provides detailed wallet account information and sync status display.
ABEL Wallet Account Details:
- On the main screen, select the Abelian tab and tap the "Profile" icon in the upper right corner
- Select the "Account Details" option to view the following information:
- Wallet name (can rename wallet here)
- Wallet address (long address/short address)
- Wallet privacy type (Pseudo-Private/Fully-Private/Legacy)
- Available balance
- Block sync status
- Transaction statistics
- Creation date
- Wallet-related keys: View, Serial Number, Detector Root
QDAY Wallet Account Details:
- On the main screen, select the QDay tab and tap the "Profile" icon in the upper right corner
- Select the "Account Details" option to view the following information:
- Wallet address
- Network parameters
- Linked ABEL wallet address (Pseudo-Private)
ABEL Network Sync Status:
- View sync status in the "Account Details" page of the Abelian wallet
- Sync status includes:
- Active: Green dot, wallet is fully synced with the blockchain
- Inactive: Red dot, wallet is not connected to the network or sync failed
Purchase ABEL
Abelian Pro provides the ability to purchase ABEL using USDT and USDC.
Purchase Steps:
- On the wallet main screen, select the Abelian tab
- Tap the "Buy ABEL" button
- On the "New Order" page, enter the purchase amount (USD), which will automatically calculate the amount of ABEL tokens you can purchase. Tap the "Place Order" button
- On the "Payment Method" page, select the payment method:
- USDT: Purchase ABEL using USDT (Ethereum, Binance Smart Chain, TRON)
- USDC: Purchase ABEL using USDC (Ethereum)
- After selection, tap the "Checkout" button, review the transaction details, and scan the QR code with your payment tool to pay.
- Wait for transaction confirmation. After successful transaction, ABEL will be automatically added to the Abelian wallet;
- On the "History" page, you can view transaction records.
Convert USD8
Abelian Pro provides the ability to convert USD8 stablecoin using USDT and USDC.
Conversion Steps:
- On the wallet main screen, select the QDay tab
- Tap the "Convert" button after the USD8 token
- On the "Get USD8" page, enter the amount of USD8 tokens to convert, which will automatically calculate the amount of USDT or USDC to pay. Tap the "Continue" button
- Select the payment method:
- USDT: Convert USD8 using USDT (Ethereum, Binance Smart Chain, TRON)
- USDC: Convert USD8 using USDC (Ethereum)
- After selection, tap the "Checkout" button, review the transaction details, and scan the QR code with your payment tool to pay.
- Wait for transaction confirmation. After successful transaction, USD8 will be automatically added to the QDay wallet;
- On the "History" page, you can view transaction records.
Frequently Asked Questions
Q: Can ABEL wallet be imported into MetaMask?
A: No. ABEL uses quantum-secure cryptographic algorithms that are incompatible with the EVM standard used by MetaMask. Only QDay wallets can export private keys and be imported into MetaMask.
Q: Which wallet type should I use?
A:
- For daily transactions and frequent use: Pseudo-Private wallet is recommended
- For large asset storage or extremely high privacy needs: Fully-Private wallet is recommended
- Legacy wallets are no longer recommended; please migrate existing wallets to new MLP wallets
Q: What if I forget my wallet password?
A: If you have a mnemonic phrase or private key backup, you can delete and reinstall the app, then import the wallet using the mnemonic phrase or private key and set a new password. Without a backup, wallet recovery is impossible.
Q: What if a transaction keeps showing as pending?
A:
- ABEL transactions: Check network sync status and wait for more block confirmations
- QDay transactions: May be due to gas fees set too low; you can try to accelerate the transaction or wait for automatic confirmation when the network is less congested
For more help, please visit the QDay Official Website or join the Discord Community for discussion.